

If you’re a contractor, maintenance lead, or plant engineer, you need a fast way to locate the fault, decide “repair or replace” with confidence, stop the leak, and pass acceptance testing. This guide distills best practices and field lessons from industry resources into an actionable playbook.
What you’ll solve (aligned to search intent)
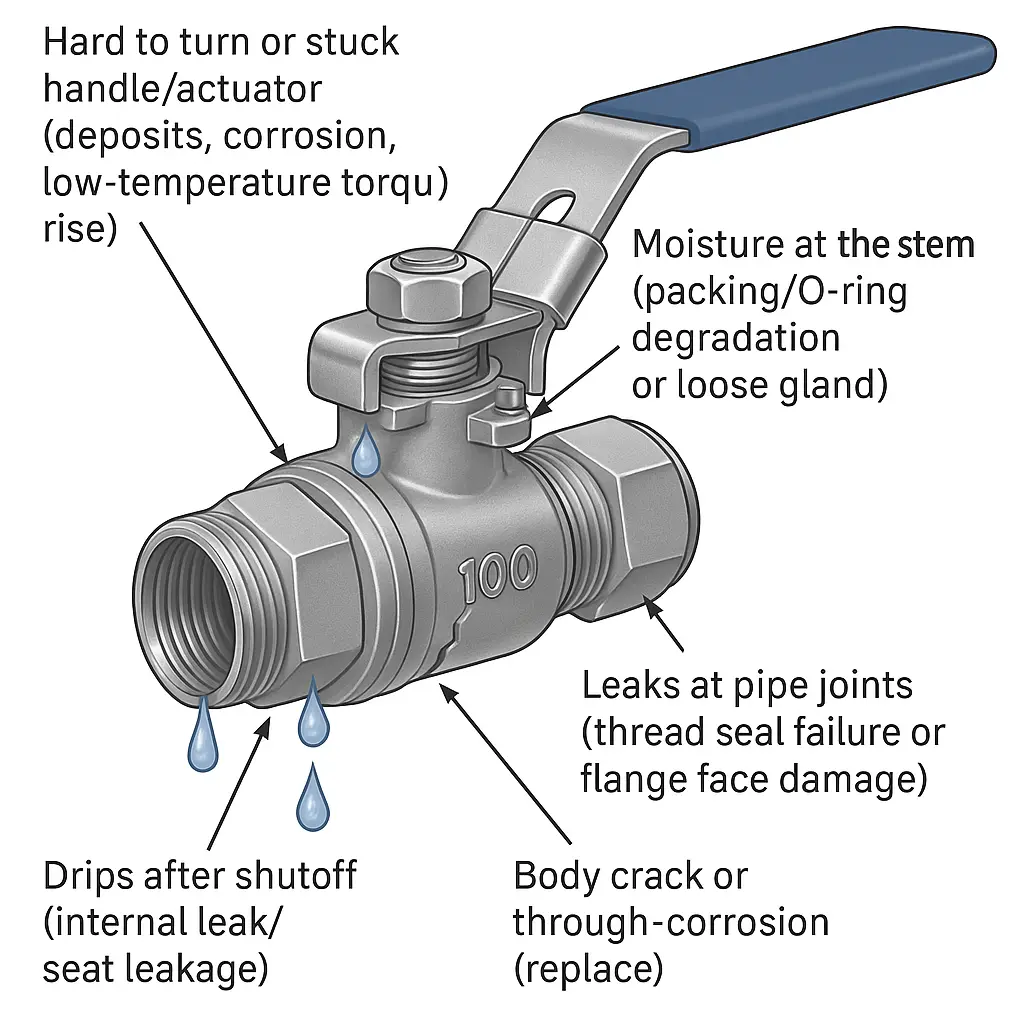
Common symptoms and risks
- Drips after shutoff (internal leak/seat leakage)
- Moisture at the stem (packing/O‑ring degradation or loose gland)
- Leaks at pipe joints (thread seal failure or flange face damage)
- Hard to turn or stuck handle/actuator (deposits, corrosion, low‑temperature torque rise)
- Body crack or through‑corrosion (replace)
Impacts: product loss, energy waste, HSE exposure, unplanned downtime, test failures.
Tools you’ll get here
- A 10‑minute repair‑or‑replace decision tree
- Field repair SOP (soft‑seat/general use)
- Heavy‑duty metal‑seat refurbishment overview
- API/ISO/EN testing notes and an acceptance checklist
- A maintenance record template (audit‑friendly)
Repair or replace: a 10‑minute decision tree
Quick criteria (print‑friendly)
Choose “replace” if any applies:
- Body crack, porosity leak, or flange face damage >0.5 mm that’s uneconomical to restore
- Service life ≥8–10 years with recurring faults despite repair
- Service exceeds valve MAWP or material temperature/chemistry window
- Recurrent internal leakage with visible ball/seat scoring and soft‑seat swap didn’t help
- Stem scoring/misalignment or deformed gland; repeated tightening fails to seal
Choose “repair” if:
- Minor stem seepage (often loose gland/aging packing)
- Threaded joint seepage (re‑seal solves it)
- Partial closure or hard turning caused by deposits; cleaning/relube restores function
Soft‑seat vs metal‑seat boundary
- Soft‑seat (PTFE/RTFE/PEEK): prioritize O‑ring/seat replacement, cleaning, and compatible lubrication.
- Metal‑seat: typically requires surface engineering (HVOF/APS) plus grinding/lapping to restore metal‑to‑metal sealing; cleaning alone rarely fixes it.
Must‑replace thresholds (safety/compliance)
- Any damage into the pressure boundary (body/cover/end cap)
- Actuator torque cannot reasonably be increased to exceed max operating torque with margin
- Tight leak class required (e.g., gas Class VI) but ball/seat geometry cannot be economically restored
- Mandatory certifications (fire‑safe/low‑fugitive/NACE) cannot be met after repair
Leak localization and required tools
The four primary leak sources
- Stem area: wet under the handle = packing/O‑ring/gland issue
- Connections: threaded/flanged/welded ends = sealing/assembly issue
- Body: casting defects or corrosion = replace
- Internal (won’t shut off): seat wear, deposits, or ball/seat damage
Tools and consumables
- Wrenches/sockets, screwdrivers, hex keys
- PTFE tape or liquid thread sealant (per thread standard)
- Compatible O‑rings/packing/seats
- Penetrating oil (metal valves only; avoid petroleum on plastics)
- Lint‑free cloths, plastic scraper, soft brush
- PPE: gloves, goggles; LOTO and depressurization means
Field quick‑repair (soft‑seat/general) step‑by‑step
- Step 1: Isolate and depressurize. Close upstream, open downstream vent/bleed; confirm zero pressure.
- Step 2: Tighten the packing gland. Turn the gland nut a small increment (about 1/4 turn) and observe. Do not overtighten.
- Step 3: Replace O‑ring/packing.
- Remove handle and gland; extract old packing/O‑ring; inspect stem for scoring.
- Clean the stuffing box; install new packing/O‑ring; apply a thin film of compatible grease.
- Reassemble and tighten evenly for uniform preload.
- Step 4: Reseal threaded joints.
- Remove the valve; clean male/female threads; wrap PTFE in the tightening direction (typically 2–4 wraps).
- Reinstall and snug to seat; avoid over‑torque that can crack bodies.
- Step 5: Repressurize and functional test.
- Ramp pressure slowly; inspect stem, joints, body; cycle the valve several times to verify smooth operation and no leakage.
Safety notes: Avoid petroleum‑based penetrants/lubes on PVC. Expect higher torque at low temperatures—adjust actuator margin accordingly.
Deeper repair: internal leaks and stuck valves
Debris removal and seat inspection
- Isolate and depressurize; remove the valve (2‑piece usually needs line break; 3‑piece allows in‑line body removal).
- Remove deposits/scale from ball and seats; inspect for scratches/deformation.
- Replace seats if hardened, cracked, or deformed.
Seat/O‑ring identification and replacement
- Materials: PTFE/RTFE for general service; PEEK/DELVON for higher temp/pressure; metal seats for hot/abrasive/dirty service.
- Replace matching O‑rings/springs with the seats to avoid old parts compromising new seals.
Freeing a stuck valve
- Repeated cycling and gentle tapping on the body to dislodge particles (never strike plastics hard).
- For metal valves only, apply penetrating oil at the stem, wait ~20 minutes, then try again.
- If still seized, do not force the stem to avoid shearing—replace.
Metal‑seated/heavy‑service refurbishment (professional)
Surface engineering options
- HVOF tungsten‑carbide matrices: high hardness, abrasion/erosion/temperature resistance (mechanical bond).
- APS ceramic (TiO2/Cr2O3): extreme corrosion/abrasion resistance for certain chemistries.
Process chain
- Grit blast → strip to base metal → verify ball roundness → re‑spray per parameters → grind to size → rough/fine lap sealing areas → verify thickness and tolerances.
- Note: After multiple repairs, coating thickness/roundness limits may be reached—check customer specs for max allowable build.
When to stop repairing
- Ball roundness cannot meet metal‑to‑metal sealing requirements
- Repeated coating spallation or base metal damage beyond practical weld/restore
- Flow‑path erosion encroaches on pressure boundary in high‑velocity service
Strategy by construction/material/end connection
1‑/2‑/3‑piece valves
- One‑piece: most leaks require full replacement.
- Two‑piece: line break needed for maintenance.
- Three‑piece: end caps remain in line; remove body for seat/packing service—minimizes downtime.
Floating vs trunnion
- Floating: differential pressure pushes ball onto downstream seat—particles can score soft seats.
- Trunnion: spring‑loaded seats suit larger sizes/pressures; internal leaks often relate to seat springs or sealing lips.
Material cautions
- Stainless steel: most penetrants/greases OK if media‑compatible.
- Brass: avoid ammonia/sea‑water corrosion risks.
- PVC: avoid petroleum‑based penetrants/solvents; apply lower torque, gentler handling.
Connections
- Threaded: apply PTFE or liquid sealant in the tightening direction; don’t overwrap.
- Flanged: inspect surface finish/runout; tighten in a star pattern with correct gasket/class.
- Welded: manage heat‑affected zone; remove internals if required; use weld‑ready designs.
Actuation and safety (often overlooked failure sources)
Torque and safety margin
- Size actuator to exceed max operating torque with ≥30% margin; low temperature can sharply raise frictional torque—select low‑temp grease and higher margin.
Stem length and coupling fit
- Too short: disengagement from actuator coupling → loss of control.
- Too long: bottoms against actuator → abnormal torque, incomplete closure, leakage.
- Match stem top to actuator standard and verify coupling depth.
DBB vs DIB (isolation philosophy)
- DBB: dual block and bleed—good for isolation plus cavity venting.
- DIB: double isolation both directions—provide cavity overpressure relief.
ESD/SIL and PST
- Critical shutoffs: implement ESD logic and SIL targets; schedule partial stroke testing (PST) and retain records.
Testing and acceptance: make repairs auditable
Tightness and pressure tests
- API 598 / ISO 5208 / EN 12266‑1: follow specified test media, time, differential pressure, and allowable leakage classes (II–VI). Document results.
Low fugitive emissions
- ISO 15848‑1: understand temperature/pressure classes and cycle counts; spring‑loaded packing and optimized stuffing box length help compliance.
Fire‑safe
- API 607/6FA: common in refining/offshore/storage—verify model, lot, and applicability.
Repair dossier (suggested contents)
- ITP (inspection & test plan), MTC 3.1, assembly torque records, pressure/seat leak test reports, O2 cleaning certificate (if applicable), part batch/serial numbers, photos.
Preventive maintenance and storage
Exercise/clean/lubricate
- Full‑stroke cycle at least quarterly; clean stem area; use only media/material‑compatible lubricants.
Upstream filtration
- Strainers/filters in dirty service cut internal leaks and sticking.
Storage rules
- Dry, ventilated, shaded, dust‑free; periodic checks. Cycle mounted actuators monthly. Store fully open or fully closed to avoid seat cold deformation. Protect bare metal with suitable rust inhibitor.
Real‑world FAQ (from forums, distilled into actions)
- Closed but still dripping—what now?
- Check if the stem area is wet (packing) vs dry (internal leak). For internal leaks, inspect/replace seats and clean the ball. If still leaking, replace the valve.
- Handle broke and OEM handle is unavailable—options?
- Match the drive (square/rectangular per ISO 5211) and use a compatible replacement handle. If the valve is old and parts scarce, upgrade to a 3‑piece for easier future maintenance.
- Gland keeps tightening but leak persists?
- Packing likely degraded or gland misaligned. Replace packing/O‑ring and inspect the stem for scoring. A scored stem requires stem or valve replacement.
- Valve is completely stuck—non‑destructive rescue?
- Depressurize → repeated cycling and gentle tapping (no heavy blows on plastics) → small dose of penetrant on metal valves only → incremental wrenching. If immovable, avoid shearing—replace.
- When is full replacement more economical?
- Repeated failures, high downtime cost, metal‑seat refurbishment lead time (often 2–6 weeks), age ≥8–10 years, or upgraded requirements (fire‑safe/low fugitive/higher class).
Checklists and next steps
Ball valve repair and acceptance checklist (high‑level)
- Service data: medium/temperature/pressure/solids/corrosion
- Valve type: 1/2/3‑piece, floating/trunnion, soft/metal seat, end connection
- Fault and root cause: leak point, wear/deposits, gland/packing condition
- Parts: seats/O‑rings/packing/stem/handle/bolts & gaskets
- Tests: standard (API 598/ISO 5208/EN 12266‑1), media/time/dP, leak class target and result
- Docs: ITP, MTC 3.1, torque records, test report, photos
Repair record template (suggested fields)
- Serial/spec, date, technician, service conditions, fault description, corrective actions, parts batch/lot, test outcomes, re‑inspection date
Need a recommendation or fast replacement?
- Share medium, temperature, pressure, size, end standard, and the symptoms. You’ll get seat/torque recommendations and a repair vs replace proposal.
Why YHK VALVE (for project and procurement outcomes)
- Standards and certifications: API 6D, API 598, EN 12266‑1, ISO 5208, ISO 15848, CE, SIL3
- Capacity and delivery: 20,000 m² plant, 5 lines, 8,000 t/year output, 220 staff—fast turnaround on volume orders
- Process and quality: CNC/large horizontal and gantry machining centers; end‑to‑end ITP, third‑party inspection, 18‑month warranty with on‑site support
- Custom OEM/ODM: materials/coatings/actuation, DBB/DIB, low fugitive, fire‑safe packages
Want editable Word/Excel versions of the “Repair & Acceptance Checklist” and “Repair Record Template,” or a tailored repair/replace plan? Send your service data and we’ll respond with a fit‑for‑purpose kit.
